Showing posts with label How to. Show all posts

How to Trace Mobile Numbers

With the rapid growth of mobile phone usage in recent years, we have often observed that the mobile phone has become a part of many illegal and criminal activities. So in most cases, tracing the mobile number becomes a vital part of the investigation process. Also sometimes we just want to trace a mobile number for reasons like annoying prank calls, blackmails, unknown number in a missed call list or similar.

Even though it is not possible to trace the number back to the caller, it is possible to trace it to the location of the caller and also find the network operator. Just have a look at this page on tracing Indian mobile numbers from Wikipedia. Using the information provided on this page, it is possible to certainly trace any mobile number from India and find out the location (state/city) and network operator (mobile operator) of the caller. All you need for this is only the first 4-digit of the mobile number. In this Wiki page you will find all the mobile number series listed in a nice tabular column where they are categorized based on mobile operator and the zone (state/city). This Wiki page is updated regularly so as to provide up-to-date information on newly added mobile number series and operators. I have used this page many a time and have never been disappointed.

If you would like to use a simpler interface where in you can just enter the target mobile number and trace the desired details, you can try this link from Numbering Plans. Using this link, you can trace any number in the world.

By using the information in this article, you can only know “where” the call is from and not “who” the caller is. Only the mobile operator is able to tell you ”who” the caller is. So if you’re in an emergency and need to find out the actual person behind the call, I would recommend that you file a complaint and take the help of police. I hope this information has helped you!
Read More...

Samsung Galaxy Tab Battery Saving Tips

Traveling out of town could be disastrous for computer users tablets Samsung Galaxy Tab if you forget to bring the charger. In these conditions, you seemed to be forced to conserve battery consumption. Want to know how? Read the following tips.


1. Close unused applications

Running multiple applications simultaneously making wasteful battery consumption. For battery-efficient, close applications that are not being used with a back key. Rather than the home key, more efficient battery.

2. Turn off auto sync

Turn off auto sync after adjust your Google account. To enable that feature, you can select Settings, then Accounts and sync, and sync manually when needed.

3. Turn off bluetooth and wifi

In light conditions, bluetooth and wifi participate in making the battery so wasteful. Therefore, turn off bluetooth and wifi when not in use.

4. Restart phone

If the battery consumption is excessive or phone function can not be used, restart the phone by pressing the power key for 7.5 seconds or press and hold the power key, and select power off.
Read More...

How to choose the best Linux for you?

With all the many reasons to use Linux today, particularly in a business setting, it’s often a relatively easy decision to give Windows the boot. What can be more difficult, however, is deciding which of the hundreds of Linux distributions out there is best for you and your business.

Which one is right for you? 

 That depends on several key factors. Judging by popularity statistics, as tracked both by Distrowatch and in a recent study at LinuxTrends, Ubuntu is clearly the most popular distribution, or “distro.” There’s no denying that Ubuntu has many benefits for business users; at the same time, there are many, many other possibilities, each offering its own twist on Linux.

1. Skills
If you or the other people in your office have never used Linux before, you’ll probably want to stick with a distribution that’s better suited to beginning users. This is one of Ubuntu’s defining characteristics, but Fedora, Linux Mint, and business-friendly openSUSE can be good choices as well. Personally, I’d steer a brand-new user to either Ubuntu or Fedora.

Be sure to avoid alpha, beta and release candidate (RC) versions of the software, since they can sometimes be unstable. If, on the other hand, you consider yourself a power user, the more do-it-yourself distributions include Gentoo, Debian, Arch Linux and Slackware; or, with Linux From Scratch, you can even build your own distribution!

2. Focus
If your business is focused on a particular area of computing, it’s worth checking out all the many niche-specific Ubuntu versions, including EduBuntu and UbuntuScience.

3. Support
Each distro has its own online community, which is often the best place to get free yet comprehensive help when issues arise. Before you pick a distro, it can be a good idea to get a feel for the culture of its community by visiting the associated forums; some are innately more helpful than others.

If you’re not comfortable with getting support in this way, however, you may want to purchase a commercial Linux version with tech support from a vendor. Red Hat Enterprise Linux and SUSE Linux Enterprise Desktop (formerly known as Novell Linux Desktop) are typically among the top choices in the business category of Linux distros.

4. Hardware
One of Linux’s many virtues is that it can run beautifully well on older hardware, so–unlike with Windows–it’s not necessary to have the latest, cutting-edge machines. For those with very old hardware, Puppy Linux is typically a good choice. For resource-limited desktop systems, XUbuntu and Debian XFCE edition can be particularly useful.
Even with relatively modern machines, peripherals can also make a difference in the choice of a Linux distro. If you need to use a media card reader or a particular printer, for instance, it’s probably worth checking ahead of time whether the distros you’re considering have worked with it before. Among all the major distros out there, Ubuntu has probablydone the best job with hardware compatibility.


5. Software
Similarly, if there is an application your business just can’t do without, you should plan ahead to make sure you won’t have to, even for a minute. I’d recommend checking first to see if there’s an open source version of the software. If it’s proprietary-only, however, you’ll again want to check to make sure that others have succeeded in getting it running on the Linux distro you’re considering–chances are it will be fine, but it’s always better to know ahead of time.

If you’re still having trouble deciding on a Linux distro, there are a number of online “tests” to help guide your choice, and it can be worth checking them out. The best ones I’ve seen are the zegenie Studios Linux Distribution Chooser and polishlinux.org’s Distro chooser.

Whichever distro you pick, it’s a good idea to try it out first using a Live CD or Live USB–that way, if you decide it’s not for you, nothing was ever put on your system. If you do like it, it can be a good idea to start using it in dual-boot fashion, so that Windows is always there if you–or a must-have application–really needs it (though in most cases that won’t be necessary). I’d also recommend getting a book for reference; for Ubuntu users, for example, something like The Official Ubuntu Book can be a big help.

Always remember that choice is what Linux is all about. If the first distribution you pick doesn’t feel right, there are plenty more out there to try, and most won’t cost you a penny. Just try that in the proprietary world!
Read More...

Installing Windows 7 from a Pendrive (USB)

Objective: This tutorial will help you to make a bootable windows 7 pen drive.

Things needed: 
  • Windows 7 ISO image (Any version) + PowerISO software Installed. 
OR
  • Windows 7 DVD
  • A Pen drive preferably having space of 3GB.
Steps:
     1.  Install PowerISO and mount the windows 7 Image or if you have a windows 7 DVD insert it.
    
     2.  Plugin your pendrive.
    
     3.  Go to Control Panel\All Control Panel Items\Administrative Tools\Computer Managment\Storage you  can see your Disk layout. Check the Disk number for your pendrive.

Usually if you have one HD the the disk number is 1 else its 2.

    4.  Once you know your disk number open cmd prompt with Administrative privilage.

    5.  Execute the following steps one by one
  1. diskpart
  2. select disk 2
  3. clean
  4. create partition primary
  5. select partition 1
  6. active
  7. format fs=fat32
  8. assign
  9. exit
Once you are done copy the files from your virtual Windows 7 drive or Windows 7 DVD using the following command.
 xcopy d:\*.* /s/e/f e:\ where d is your windows 7 drive and e is your pen drive
Thats all. Now you can boot through your pen drive. If its not booting check your bios for option to boot from pen drive. Cheers!
Read More...

How to become a world class computer Engineer - Seven Steps

I read the post by Abhishek Desai and found it very helpful so I am sharing it here. I bet it will be very helpful to Indian Computer Engineering Students.
Seven Steps to become a world class computer Engineer
 
Reasons for writing this post:
  • I feel I have not done enough to become a good computer engineer. May be I did not have someone who could guide me properly. We were only the second batch of Computer Engineering at Nirma Institute of Technology, Ahmedabad, so we had no mentors in the industry.
  • Second reason, may be we were not mature enough.
  • Third reason, 3 Idiots was not released at that time.
  • So this post is dedicated to all the fellow computer engineering students (especially in India) who are still having a good time by bunking the classes but not doing good enough to become a world class computer engineer otherwise.
But what can I do?

1. Have the right infrastructure
  • Get yourself a decent laptop. (I prefer Mac but any decent Dell laptop is also ok)
  • Get yourself a nice internet connection with highest speed available. (Take a cut from your pocket money if you have to but this is a must)
  • Get yourself an iPhone (I know it is expensive in India but you will have to use world class gadgets to become world class engineer)
  • Make your home or hostel room WiFi enabled. (This is not expensive. You will get a decent router in 2-3k.)
  • If you are not able to do any or all of the above things, don’t worry you can still become a good computer engineer. So hang on and keep reading.
2. Learn to use Google Reader
  • Google reader will become the best companion of yours for lifetime if you use it properly.
  • It is nothing but a cool RSS reader from Google using which you can subscribe to blogs to get latest updates and posts. So if you have a gmail account you are ready to go. What? You do not have a gmail account yet!! Go get one right now. Stop reading. Open a gmail account now and come back. I am waiting.
  • I am still waiting.
  • Ok great, so you have a gmail account now, good. Watch this video . It explains in plain english how to use google reader.
  • Software, Web Search Strategies, Wikis, Social Bookmarking, Social Networking, Blogs, Pod casting and Cloud computing on http://www.commoncraft.com/ (Now you understand why I told you get the fastest internet connection available?). You don’t have to see them all at once but do check them all and understand.
  • Done? Ok so you are ready to become a world class computer engineer now.
  • Now you understand Google Reader, so it’s time to subscribe to interesting blogs. Subscribe to following blogs.
  1. Techcrunch.com (King of Technology Blogs)
  2. Gigaom.com (Michale Arrington of Techcrunch considers Om as his Guru)
  3. ReadWriteWeb.com
  4. Pluggd.in (Indian Techcrunch)
  5. JoelOnSoftware.com (a must read for programmers)
  6. CodingHorror.com (another must read for programmers)
  • There are many such blogs but to start with these are ok. You will keep finding other interesting blogs as and when you will come across some.
  • Getting used to read on computer takes time and patience so just keep reading it.
  • So I guess we are done with Google Reader part here. This means you have to open up Google Reader as soon you bunk the classes or as soon as you get the time to check your mails.
Seven Steps to become a world class computer Engineer
3. Academic Earth
  • Do you want to see how professors teach in Harvard and Stanford? Do you want to see how their lectures are conducted? You can now, we were not able to do that in our time.
  • Go to www.academicearth.org and you will see videos of actual lectures and courses of Harvard, Yale, Stanford. Now you know whose lectures to watch after bunking the classes or after getting back to home.
  • You do not want to miss the chance of studying in these universities without going to US to giving them millions in fees right? and guess what? Attendance is not compulsory here :)
  • Learn any web language quickly and start building
  • I would suggest PHP or Ruby. ASP.NET C# is also fine if you already know something about it.
  • And start building something on it. It can be anything. But start programming on web now. Most of you are never going to write a program C, C++ or COBOL in your lifetime. I would not advise against learning them though.
  • After you know something about web programming, read “Getting Real” from 37Signals.
  • Now again build something using whatever you learned from the above book.
5. Assume you are in Sillicon Valley
  • I know this sounds little weird but that’s the way it is.
  • The best of the minds in the world are there and you do not want to miss out on that right?
  • Thousands of things happen everyday in Sillicon Valley and you can remain updated by reading above blogs I mentioned.
  • So start feeling the air.
6. Start asking why?
  • When you are attending a lecture or reading anything, have a habit of asking why?
  • For e.g. Why we have to study “Strength of Materials” when most of us are going to write web applications in PHP or ASP.NET?
  • When you ask why often, you start understanding the logic, the reason behind doing anything.
  • Same as they have said in 3 Idiots, don’t learn to get marks but learn to know something, to achieve the excellence. When you start asking why, you start on the right path.
7. Understand computer hardware
  • Most people thinks this is boring and unnecessary.
  • May be it is, but it will certainly make you better programmer, even if you will never touch the inside of the computer again.
  • Basic understanding of hardware is necessary to understand how computer works.
  • You have to understand following 100% without any doubt in your mind.
  1. How your high level programming code becomes 0s and 1s and execute?
  2. The text which you are reading now is also consisting of 0s and 1s only then how come you are reading the alphabets here?
  3. FYI I am still not 100% clear on this. But I will be one day. Till then I am not a good computer engineer.
I guess I have get you started here.

By following any or all of the above steps you are destined to become world class computer engineer. By no means I am asking you to stop whatever you are doing right now in your college.
These are additional things you have to do. It takes hard work to become world class right?

You are always on your own to achieve the path of excellence. Friends and Tutors can only guide you, they can not make you one.

I would request my fellow classmates to add points in this post. I believe our batch 99CE in Nirma Institue of Technology had one of the best and brightest minds in the world. Do you have any doubt? Well this guy is one of them. 99CE people are in MIT, Google, Apple, Barclays, Bank of America to name a few. They are spread across the world and are on their way to become future leaders.

I would also request people who have read this post and feel they can add something here to help students of computer engineering. My aim is to have great people coming out of Indian Engineering Colleges.

Last words, by no means above list is exhaustive and complete. There are “n” number of ways to achieve excellence. These are my personal views and I have learned them long and hard way. I hope to make your journey little easier by this post.

The post was written by abhishek desai. Link to this post is :
Abhishek Desai
Read More...

Navigating The File System And Simple Commands in Linux

NOTE: Only for the very fresh starters with Linux.
As we are doing the bare minimum these are the most often used commands:
cd = change directory
mkdir = make directory
rmdir = remove directory
rm = remove file
cp = copy
mv = move or rename
ls = lists directories and files
cat = show contents file

O.K. let's play:
Open an console on desktop 1, open the home directory by clicking on it on desktop 2 ( there you can see and verify the commands executed on desktop 1 )


CODE
$ mkdir One  ( without the $ ) ( makes a dir One in your home dir )
$ mkdir one  ( Linux is case sensitive so "One" and "one" are not the same ! )
$ cp tessst One  ( copies the file tessst, that we made in previous Tip, to dir One )
$ mv ssset one  ( moves the file ssset, that we made in previous Tip, to dir one )
$ mv one One   ( moves dir one in dir One )
$ cd One   ( see how the promt puts the current dir in in the prompt ) ( puts you in dir One )
$ ls  ( shows you what is inside One )
$ cat tessst  ( shows contents file tessst )
$ rm tessst  ( removes file tessst from One dir )
$ cd ..  ( puts you back in your home dir )
$ rm tessst  ( removes tessst from home dir )
$ rm -rf One  ( now all files and directories we played with are removed )

We have a look in the filesystem:

CODE
$ cd  /
$ ls
This shows you the directories in “/“ (root filesystem): /boot, /etc, /initrd, /lost+found, /opt, /root, /tmp, /var, /bin, /dev, /home, /lib, /mnt, /proc, /sbin, /usr.

CODE
$ cd /mnt
$ ls
This shows you the mounted devices, cdrom, cdrom2, floppy, (win_c)

CODE 
$ cd  ( Brings you back to your /home )
$ ls  ( What is in your home )
$ ls -a  ( What really is in home !!  The argument “-a” shows the hidden files. Hidden files start with “.” )
$ touch .tessst  ( Makes an empty hidden file called .tessst in /home )
$ ls  ( You don't see .tessst )
$ ls -a  ( You do see .tessst )
$ rm .tessst  ( Removes the hidden file .tessst )
$ ls -al  ( Shows you all the files in /home with their “permissions” more about that later. )

To know more about these commands and the arguments you can give them, see: "man cd" "man cp" "man mv" etc. etc.
Read More...

Linux Tips - Lost User Password

Now, just imagine, you have a sudden strike of growing old, and, you forgot your user password. I know it´s hard to figure, but weirder things happen !

The solution however is simple:
CODE
$ su
< root-password >
# passwd pkb
( if that is your username, don´t use mine )

Type in a new password ( you will likely get an error message, ignore it )
Type in the same password again !

Log out as root and log in as user with your new password !
( I said is was easy ! )

Next time we will attack the forgotten ROOT password ! A bit more complicated but it sure can be done.
Read More...

Five Easy Steps to Create Super Strong Passwords

Passwords are your first and last line of defense. Most people do not seem to understand the importance of this tool. It’s only when their account is hacked, password is stolen or some security is compromised with, that they bother to exercise due care in dealing with passwords. Creating an ultra-strong password and not sharing it with world is all it takes to be safe on the web.
Here’s a guide that will help you create an easy-to-remember but strong password.


Essentials of a good password

1. Password should at least be 8-10 characters long.
2. Passwords should be a combination of numbers and letters.
3. Letters should be both capital and small.
4. At least one symbol or special character should be present.

Steps to create a strong password

Step 1. Select A Sentence: First step is to select an 8-10 words sentence. The important thing to keep in mind here is that the sentence should not be obvious or guessable. Any random sentence is good enough. Do not take guessable and/or short sentences like “I first name is XYZ“, etc. For the purpose of explaining, we will take the first line of this post as the sentence.

Passwords are your first and last line of defense”.

Step 2. Trimming the words into characters: Reduce the words to their first letters. For example, “Passwords” can be reduced to “p“. Also, words like “are” can be changed to “r“, So our sentence gets reduced in the following manner:

Passwords [p] are [r] your [y] first [f] and[a] last[l] line[l] of[o] defense[d]

Now, the password looks like this: pryfallod
*
Step 3. Insert Numbers: As said before, a good password has both, numbers & alphabets. So to get numbers, we can do two things. Firstly, the word in Step 1 can be represented by numbers. In our example, “first” in the sentence can be represented by “1” instead of “f“. Secondly, letters in Step 2 can be converted into numbers which look similar. In the present case, the second last letter “o” can be changed to “0[zero]. Similarly you can substitute ” l” for “1“.

After this step, our password turns into: pry1all0d

Step 4. Capital & Small Cap Letters: Some of the letters in the password have to be capitalized. Now we arrive at the question, which ones? The first and last letter can be selected. Or, perhaps, those letters can be selected which are more prominent or more important. In our case, “passwords” and “defence” happen to be the most prominent words in the sentence. These words need not be at the end or start of the sentence.

Now our password looks like: Pry1all0D

Step 5. Special Characters or Symbols: Symbols lend and extra level of security to the password and make it nearly impossible to crack. One can randomly add a special character to the password or follow the same method that one did in Step 3 with numbers.

For instance, “l” can be replaced with “!” or “a” can be replaced with “@“. Or randomly substitute letters with symbols like changing “y” with “$“.

Final password: Pry1al!!d

key chain accessNow, this password is really difficult to crack. Looking at it, one may think that it would be really hard to memorize such a password. However, it isn’t that hard to remember it. In fact, by the time I complete writing the article, I myself have memorized the password. Moreover, even if you forget the password, you’ll always have the original sentence to help you recall the password.

Now that you have a good password, here are a couple of things you should take care of;

* You should never share password with somebody else, not even your best buddy or spouse.
* You should never write down your password anywhere, neither on a paper nor in notepad or document file.

Often, the best passwords lose their importance if any of the two tips above isn’t followed.

Take care and secure yourself.
Read More...

A Complete Guide on Getting Your Blog Indexed by Google within 24 Hours

A common problem faced by most of the bloggers is getting their blog indexed in Google or any other major search engines. If you’re blogging on Blogger-hosted blog, then you don’t have to worry about getting indexed in Google as all your entries or posts are shown in Google Search Results immediately at the instant time you hit the “Publish” button. But, it’s really frustrating for Self-hosted WordPress users and especially new blogger s who really have to do everything manually to be indexed in Google.
After creating your blog, just follow these simple steps and you’ll see your website in Search Engine Results within 24 hours for sure. (100% working)

Step #1: Install “All in One SEO pack plugin” for WordPress

This is the first thing that I’ve done immediately after migrating to WordPress. Installing the All in One SEO pack plugin. Although I do not have any basic knowledge/ experience of using WordPress before, I’ve read a lot of articles about the use of this great plugin which is really essential to every WordPress users. This plugin enables you to add post title, description, and keywords for every individual posts for better Search Engine Optimization ( SEO ) and hence maximizes the chances of getting organic traffic from Google very soon after blog being launched.

Step #2: Add your site to Google Webmasters Tools

Log into Google Webmasters Tools with your Google account and add your blog/site by clicking the ‘Add a site‘ button. Then, type the domain name you wish to add, and click ‘Continue‘. You will have to verify your site using a META Tag. Copy it go to your WordPress Dashboard > Plugins > and paste the META tag in the ‘Additional Home Headers‘ at the bottom and ‘Update‘ the info. Then, click ‘Verify‘ on Google Webmaster Tools and you are done.

Step #3: Submit your Sitemap to Google

Install Google XML Sitemaps plugin for WordPress. This plugin will generate a XML sitemap which you can submit to Google Webmasters Tools or any other search engines to better index your blog. Once you’ve activated it in your ‘Plugins‘ page, you’ll see a ‘XML-Sitemap‘ link under ‘Settings‘ menu. So, build your XML sitemap for the first time by clicking on “Rebuild Sitemap” button. So, your sitemap URL will be looking like this http://www.yourblogname.com/sitemap.xml or http://www.yourblogname.com/sitemap.xml.gz. So now, go to Google Webmasters > Site Configurations > Sitemaps > Click on ‘Add a sitemap‘ button. Now, type ‘sitemap.xml‘ in the text area box which comes after http://www.yourblogname.com/ and click “Submit” button. This great plugin will automatically update your sitemap every time you publish your post.

Step #4: Adding your site to Google Analytics

First, sign into Google Analytics using your Google Account. Then, you will have to add your Website’s URL, Contact information, accept User Agreements and finally you’ll be provided with a Tracking Code. Copy the code and go to WordPress Dashboard > Appearances > Editor > Footer.php and paste the code right above the tag. This step is important to track your visitors, traffic sources, page views and more.

Google Search in 24 hrs.
Step #5: Site Stats and Valuation sites

This is another simplest way to tell to Google that you page does exist. Usually, most of us have come across site valuation sites which tells you “How Much Does Your Site Worth?” These sites already have good place/rankings in Google, Bing, Yahoo and other search engines. So, when you submit your site and check your site’s value there, it will automatically create a special page for your blog/website (like this, this and this ). This will help your site to easily get indexed by Google. Here is a list of such sites:

Alexa, About The Domain, Stat Brain, Stimator, BizInformation, Websiteoutlook, QuarkBase, Whois, Cubestat, BuiltWith, URLfan, SiteValueCheck, Business-Opportunities, NinjaWebsiteAppraiser, MyWebsiteWorth, Estimix  and etc.

Step #6: Social Networking and Bookmarking sites

Register an account with top Social Networking Sites such as Facebook ( Facebook fans page ), Twitter, Orkut and bookmarking sites such as StumbleUpon, Technorati, Digg, Delicious, and etc. As they have a good reputation in Google, they will make Googlebot to have a glance at your site. But, remember to use your site name like this www.facebook.com/yourblogname or twitter.com/yourblogname .

Step #7: Blog directories and communities

Add your blog to top directories such as Technorati, BlogCatalog, Bloggernity, GlobeofBlogs, Blogged, OnTopList and etc. This is the most easiest and effective way to get free quality back links from websites with higher Google page ranks.

Step #8: Link Exchanges

Link exchange is one of the ancient but effective way for people to get exposure to their website and get indexed. But usually, no body wants to exchange link with a blog with zero Google Page rank and no Alexa rank. Though, you can try to exchange link with your friends and peers who already have websites with good rankings or try free link exchange services such as Link Market where you can exchange links with other people.

So, if you’ve followed each and every step that I’ve mentioned above, I bet that your site/blog (at least your homepage if you’ve just started your blog) will be indexed in Google Search Engine results within 24 hours. Try to check for those links by typing “site:www.yourblogname.com” in Google Search. Good luck.

Source: Techbu
Read More...

Natter: Cross-Linking Facebook And Twitter

Natter is a free web based application that links your Facebook and Twitter accounts. Setup your account in 3 easy steps and control both the account from Twitter itself.

1. Go to the Natter home page and get started by joining the service.

2. Connect your Twitter and Facebook accounts with the service.


3. Once done, you are good to go. You can change the settings by scrolling down to the bottom of your account settings page.

What Happens When You Use Natter?

1. Whenever you update anything on Twitter it will be automatically posted to your Facebook account. On the other hand, if someone comments on the Facebook update, the app auto-posts a @ reply to Twitter with your name and the message.
NOTE: You can also control the tweets to be posted by using a custom hashtag (#) in your Tweet. You can add the custom tag in Natter settings.
2. It automatically converts your Twitter name to the real world counterpart.

3. Natter scans your tweets for links and if found, updates your Facebook account with a new post.
Read More...

How To Install Ubuntu 10.10 Inside Windows

Do you want to try the newest operating system for PCs? Ubuntu 10.10 has recently been released. Although many people would enjoy trying it, the need to make permanent changes to their computers may be stopping them.

There is a way to install Ubuntu 10.10 inside of Windows using the Wubi installer. If you decide you have no use for it, it can always be easily uninstalled later. Below, I’ll show you the details of a typical Wubi/Ubuntu installation.

First, you’ll need to download the correct Wubi file. The current Wubi at Ubuntu.com hasn’t been updated yet, so you’ll need to grab the file from a mirror location.

Try this one:  mirror.pnl.gov

Or this one:   mirror.anl.gov

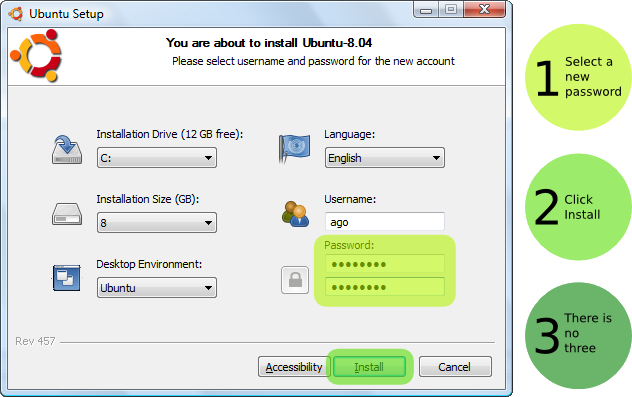
If the download goes well, you’ll have a wubi.exe file to run. When you launch it, you should see a setup screen like the one shown below. It should show “Ubunutu-10.10” at the top.

You can choose the “Desktop Environment” using the pull-down menu. In it you’ll get a choice of different versions of Ubuntu, such as Ubuntu (Desktop), Ubuntu Netbook, Kubuntu, Kubuntu Netbook, Xubuntu or Mythbuntu.

The rest of the settings are fairly obvious, but I was a bit confused when I entered my password and got an error. I didn’t notice that I had to enter the password twice.

Once you hit the “Install” button, you should see this next image. The download is fairly large. It took about 25 minutes on my Internet connection.

Once it finishes, you’ll be prompted to reboot.

Once the reboot has started, you will now have a new boot option in your Windows boot menu. Just select Ubuntu and it will finish installing. Here you can see a short video showing you basically what you’ll see as Ubuntu finishes up.


If you need help, there’s plenty of help available at Ubunutu forums.

When you return to Windows, you can find a new folder at C:ubuntu, which contains the entire installation. This copy of Ubuntu can be uninstalled using the Add/Remove applet in Windows, or by launching the “uninstall-wubi.exe” file in the install folder as shown below.
[Image Credit:wubi-installer]
Read More...

How to Install and Use Team Viewer and Work

Team Viewer
Are you interested to access your friend computer using a software which allows you to gain access to the distance computer along with allowing you to give commands using your mouse and keypad sitting remotely? Then there is an instant solution for you at no extra cost. Here are the tips for you to know that how to install and use team viewer software. Team viewer software is absolutely free of cost and easy to use. However there may be some hardware requirement from the team viewer official site such as storage space etc. However these days the memory of the systems is already enhanced many fold and hence you need not worry about that at first place.

Download and Install Team Viewer
  1. Visit Team Viewer Website and download it to your computer or laptop. [Download Here]
  2. Run the setup file
  3. You will see two options. Install OR Run, Click on “Install
  4. In the next box you will see 3 options. Select the first one that is “Personal/ Commercial Use”. Click Next Button.
  5. Accept the agreement and click on “Next” button.
  6. Select “Normal Installation (default)” and then click on “Next”.
  7. In the last box you will see 2 options. 1. Full Access and 2. Confirm All. Select the first one if you want to give full access to your partner OR select 2nd option if you want to first confirm any action.
  8. Click “Finish” and waiting for the installation to complete.
How to Use Team Viewer?
  1. Run Team Viewer
  2. At the first screen you have two options. 1. Wait for Session and No.2 Create Session.
Wait for Session
If you want to give access to your friend so that he can operate your computer, then provide him your ID and Password.
He can then access your computer.
Create Session
If you want to access your’s friend computer. Then ask him to provide his ID and Password. Enter the ID in Create Session box and click on “Connect to Partner” button. Immediately a new box will appear, where you will have to type the password. As you enter the password, you will see the computer screen of your friend. Now you can operate his/her computer from your PC.

Why Use Team Viewer?

  • Once it is installed the team viewer can generate automatically the user name and password. This is based on the configuration of hardware of your system. This unique ID can be provided to a person to whom you want to allow for remote access of your system
  • Once you provide that specific ID to the other person who has internet connection and also has the team viewer software already installed on his system can access to your desk top screen
  • This will allow the person to share your desktop screen and view the screen
  • You can see a single screen or represent the other screen as a part of your screen
  • You can use the software to share and transfer files between the two systems
  • You can transfer file in both directions
  • By sharing the VPN you can have greater access by use of the team viewer software
You need not to worry about the security of the system as team viewer ID generation is done in a secured way and no other external person can gain access to it. Let me know if you have any problem during the installation or operating the software. Feel free to share your comments below.
[Image source: Team Viewer]
Read More...

How to Disable/Turn Off Group Notifications in Facebook

Facebook announced Groups feature, which would allow you to create and communicate with a small set of people. However, as of today, I am finding groups a bit of nuisance because of the number of notifications I have been receiving for it.

The problem is that, anyone can add you to a group, so whenever that happens you receive a notification. To top that you receive notifications whenever someone adds a post to that group.

In order to stop group notifications, first of all go ahead and click on the "Unsubscribe" link available in the group. Secondly, on top of the Groups page, you will find an button to "Edit Notifications".

Click on that button and select the radio button next to "Never notify me". In addition to that you may also want to disable Email notifications to your account.
To completely disable Group notifications, go to edit your account notifications or click this link and scroll down till you see the Groups section and uncheck the boxes next to the options you do not want to receive notifications for.

Facebook should definitely have these notifications as opt-in rather than shoving it down your account. This is definitely going to create quite a privacy nightmare once again for Facebook.
Read More...

10 Tips to Avoid Getting Adware

Adware, malware, spyware and viruses can bring your system to its knees. They are detrimental, lowering the performance of your computer. You might need to replace data. You might lose unique files. Keep the nasties away from your computer using these ten simple tips.

1. Use Firefox: Internet Explorer is the most popular browser on the market, controlling over 50% of the market share. The virus and adware creators specifically look for exploitable vulnerabilities within IE because they know that they will receive the best return on investment. Your switch to Firefox prevents some adware from infecting your machine.

2. Scan your PC once a week: Sometimes adware programmers take a sneaky approach. They will set up their programs to run quietly in the background to spy upon your activities. This once a week scan is necessary to remove any of those sneaky bugs.

3. Download from known sites: New sites for installing adware are popping up all the time. If you find something that you want to download, make sure that it is from a known site. A company like Amazon will not steer you wrong, but Bob’s House of Wares might be a little less trustable. If you are not sure whether you can trust a site, perform a quick search.

4. Install Adaware: Ad-Aware is the most popular free adware removal program on the market. It detects, quarantines and removes adware. It searches for other programs which may have been installed, highlighting them in an easy to use interface. This program does not have an anti-virus attached.

5. Do not click on unsolicited email: You are constantly receiving offers to increase this or improve that through unsolicited email. Your curiosity may be killing you, but don’t click on these emails. They accept your click as permission to install adware, spyware and malware on your PC.

6. Install Antivirus software: Installing two programs for virus and adware protection is a smart idea. It caters to the strengths of each program, increasing the overall strength of your antiadware and antiviral campaign. Some of the best antivirus software is free, providing real time protection. Programs to look at would be Avast Antivir and AVG.

7. Don’t install toolbars: Even some reputable sites install custom toolbars. They slow your system down and collect information about your surfing habits. While a toolbar might offer some perks, it may also diminish your experience by dragging your system to a halt. Toolbars from less reputable places install adware and sometimes infect your system outright.

8. Look at your task manager: If anything seems out of place with your computer, take a look at your task manager. This tells you about all of the programs and processes which are running on your computer. Examine the processes tab for anything which you don’t immediately recognize. Perform a web search for unfamiliar processes.

9. Do not click on popups: Clicking on a popup usually spells certain doom for your computer. It opens the door for the viruses and adware that want to infect your machine, telling these malicious applications to make themselves at home. Stay away from those constantly advertised screensavers and icons.

10. Trust your gut: If you don’t feel right about a site, don’t go there. If you are receiving warnings from the antivirus and antiadware programs which you’ve installed, don’t go there. If you don’t like the layout of a site, don’t go there. Trust your instincts about sites.

With proper vigilance, you can keep aggravating adware, spyware and malware from your machine. Trust your instincts. Install Ad-Aware and an antivirus program. Play it safe. The care you spend in preventing adware from infecting your machine can save money and time
Read More...

Linux Tips - Lost ROOT Password

Yesterday we had forgotten our user password and disaster strikes again today we forgot the root password.

Note: First, disconnect your PC from the net, pull the cable out !

Step 1: For Redhat and Mandrake:

Then boot from your first install CD and as the very first screen comes up hit F2 and type:

rescue ( For RedHat "linux rescue" )

and the computer will boot in rescue mode.

It will show a few alternatives, select : ¨mount the existing partitions¨ and go to the shell/console prompt.

( Booting Mandrake in "failsafe" from the Lilo menu does the same )

Step 1: For SUSE:
Boot from your first install CD and press F1 at the first screen, then choose "Rescue System" from the menu and at the prompt type "root" ( you do not need a password )

Step 1: For other distro's

Boot from the first install CD ( or any Live CD like Knoppix ) and at the bootprompt type:

CODE
linux single
( For Knoppix: knoppix single )
And it will boot in "single user mode" and you will get an odd looking prompt like “sh-2.05b#

Alternative for step 1
Sure with most Live and Rescue CDs you can also just boot in the live version, mount the partition and, as root, make changes to the files indicated below:

Step 2

CODE
# cd /etc
( if you boot from knoppix first cd to the partition your lost-password-distro is on )

We need to change two files; ¨passwd¨ and ¨shadow¨:

CODE
# vi passwd

( opens the file )
< i > ( puts vi in insertmode )

This is the first line:

root:x:0:0:root:/root:/bin/bash

Make it:

root::0:0:root:/root:/bin/bash

So just get writ of the ¨x¨ do not touch the ¨:¨ ( colons )

Save the file:
Esc
ZZ

Second file to be changed:

CODE
# vi shadow
( open the file )
< i > ( insert mode )

The first line is a long scrambled line of characters, just make it:

root:::: ( four colons ! )

Save the file
Esc
ZZ

Now you can reboot your computer. Log in as normal user, open a console and type:

CODE
$ su
# passwd

And set the new root password !

Log out as root:
Ctrl+d

And the job is done !!

WARNING: Only after setting your new root password it is safe to connect your computer to the internet or local network again !!
Read More...

How To Folder Lock Without Any Software

Paste the code given below in notepad and 'Save' it as batch file (with extension '.bat'). Any name will do. Then you see a batch file. Double click on this batch file to create a folder locker. New folder named 'Locker' would be formed at the same location. Now bring all the files you want to hide in the 'Locker' folder. Double click on the batch file to lock the folder namely 'Locker'. If you want to unlock your files,double click the batch file again and you would be prompted for password. Enter the password and enjoy access to the folder.

if EXIST "Control Panel.{21EC2020-3AEA-1069-A2DD-08002B30309D}" goto UNLOCK
if NOT EXIST Locker goto MDLOCKER
:CONFIRM
echo Are you sure u want to Lock the folder(Y/N)
set/p "cho=>"
if %cho%==Y goto LOCK
if %cho%==y goto LOCK
if %cho%==n goto END
if %cho%==N goto END
echo Invalid choice.
goto CONFIRM
:LOCK
ren Locker "Control Panel.{21EC2020-3AEA-1069-A2DD-08002B30309D}"
attrib +h +s "Control Panel.{21EC2020-3AEA-1069-A2DD-08002B30309D}"
echo Folder locked
goto End
:UNLOCK
echo Enter password to Unlock folder
set/p "pass=>"
if NOT %pass%==type your password here goto FAIL
attrib -h -s "Control Panel.{21EC2020-3AEA-1069-A2DD-08002B30309D}"
ren "Control Panel.{21EC2020-3AEA-1069-A2DD-08002B30309D}" Locker
echo Folder Unlocked successfully
goto End
:FAIL
echo Invalid password
goto end
:MDLOCKER
md Locker
echo Locker created successfully
goto End:End 
      Read More...