Showing posts with label Windows. Show all posts

How to Install and Remove/Delete/Uninstall Apps and Games in Windows Phone 7

Unlike the earlier versions of Windows Mobile where installing an application or game was very time-consuming, Windows Phone 7 offers access to the Windows Phone 7 Marketplace hub which is very similar to the iPhone App Store and the Android Market. You can now install and remove apps and games on your Windows Phone 7 device very easily.
Install Apps and Games on Windows Phone 7
Just click on the Start button and tap on the Marketplace. Press the Search button and type the name of the app or game you want to install.
You can also click on Apps or Games in Marketplace and browse through various categories of apps and games and select the one you want.
If it’s a paid app or game, just click on Buy and enter your credit card details or your mobile phone account details to buy the app.
After the installation is complete, the app will show up in the App list.
Remove / Uninstall / Delete Apps and Games in Windows Phone 7
Just click on Start and browse to the Apps or Games list.
Tap and hold the app or game you want to remove and select Uninstall / Delete.
via [1], [2]
Read More...

Service Pack 1 RC Now Available for Windows 7 and Windows Server 2008 R2

Microsoft has official released the first release candidate build of Windows 7 Service Pack 1 to the general public. In order to install the service pack, you must have a final RTM version of Windows 7. Moreover, if you have already installed a previous build( Windows 7 SP1 Beta ) of the service pack, you will have to uninstall that first. Windows Server 2008 R2 SP1 Release Candidate has also been made available for download.

Windows 7 SP1 doesn’t include any major new features. It’s mostly a collection of previously released hotfixes and updates. However, the server edition introduces two new features – RemoteFx and Dynamic memory. The final build is expected to be released in Q1, 2011.

[ Download Windows 7 and Windows Server 2008 R2 Service Pack 1 Release Candidate ]
Read More...

Microsoft says Windows 8 about two years away

Wondering how long that one-year-old Windows 7 OS will be the "current" Windows desktop platform? While nothing has been revealed in English, the Microsoft Dutch website has spilled the beans: Windows 8 will be available in about two years.

The post was actually focused on Windows 7's first birthday. In roughly Google-translated speak, the post said, at the end, "But it will take about two years before Windows 8 (is) on the market."

Windows 7 was introduced about 2 1/2 years after Windows Vista
. In that case, however, Windows Vista was ill-received, unlike Windows 7, and Microsoft needed to hurry something out. Windows 7 reached its one-year anniversary this last week, and Microsoft announced the OS had sold more than 240 million copies in its first year.

A Windows 8 release in two years would mark three years between OSes, which seems logical. After Windows Vista's numerous delays, Microsoft vowed to never go that long between OS releases again.

However, also this week at a Gartner symposium, Microsoft CEO Steve Ballmer said Windows 8 was Microsoft's "riskiest bet," at this time.
Read More...

Installing Windows 7 from a Pendrive (USB)

Objective: This tutorial will help you to make a bootable windows 7 pen drive.

Things needed: 
  • Windows 7 ISO image (Any version) + PowerISO software Installed. 
OR
  • Windows 7 DVD
  • A Pen drive preferably having space of 3GB.
Steps:
     1.  Install PowerISO and mount the windows 7 Image or if you have a windows 7 DVD insert it.
    
     2.  Plugin your pendrive.
    
     3.  Go to Control Panel\All Control Panel Items\Administrative Tools\Computer Managment\Storage you  can see your Disk layout. Check the Disk number for your pendrive.

Usually if you have one HD the the disk number is 1 else its 2.

    4.  Once you know your disk number open cmd prompt with Administrative privilage.

    5.  Execute the following steps one by one
  1. diskpart
  2. select disk 2
  3. clean
  4. create partition primary
  5. select partition 1
  6. active
  7. format fs=fat32
  8. assign
  9. exit
Once you are done copy the files from your virtual Windows 7 drive or Windows 7 DVD using the following command.
 xcopy d:\*.* /s/e/f e:\ where d is your windows 7 drive and e is your pen drive
Thats all. Now you can boot through your pen drive. If its not booting check your bios for option to boot from pen drive. Cheers!
Read More...

How To Install Ubuntu 10.10 Inside Windows

Do you want to try the newest operating system for PCs? Ubuntu 10.10 has recently been released. Although many people would enjoy trying it, the need to make permanent changes to their computers may be stopping them.

There is a way to install Ubuntu 10.10 inside of Windows using the Wubi installer. If you decide you have no use for it, it can always be easily uninstalled later. Below, I’ll show you the details of a typical Wubi/Ubuntu installation.

First, you’ll need to download the correct Wubi file. The current Wubi at Ubuntu.com hasn’t been updated yet, so you’ll need to grab the file from a mirror location.

Try this one:  mirror.pnl.gov

Or this one:   mirror.anl.gov

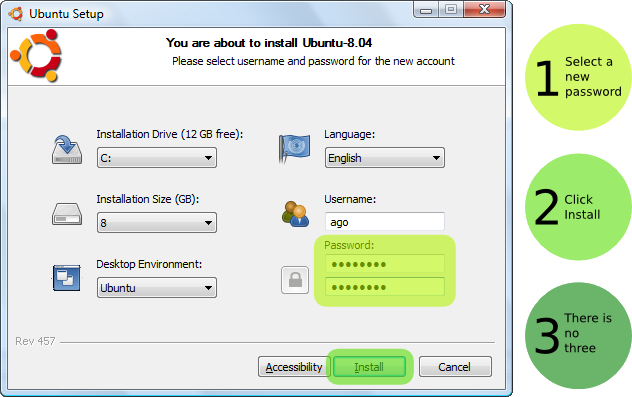
If the download goes well, you’ll have a wubi.exe file to run. When you launch it, you should see a setup screen like the one shown below. It should show “Ubunutu-10.10” at the top.

You can choose the “Desktop Environment” using the pull-down menu. In it you’ll get a choice of different versions of Ubuntu, such as Ubuntu (Desktop), Ubuntu Netbook, Kubuntu, Kubuntu Netbook, Xubuntu or Mythbuntu.

The rest of the settings are fairly obvious, but I was a bit confused when I entered my password and got an error. I didn’t notice that I had to enter the password twice.

Once you hit the “Install” button, you should see this next image. The download is fairly large. It took about 25 minutes on my Internet connection.

Once it finishes, you’ll be prompted to reboot.

Once the reboot has started, you will now have a new boot option in your Windows boot menu. Just select Ubuntu and it will finish installing. Here you can see a short video showing you basically what you’ll see as Ubuntu finishes up.


If you need help, there’s plenty of help available at Ubunutu forums.

When you return to Windows, you can find a new folder at C:ubuntu, which contains the entire installation. This copy of Ubuntu can be uninstalled using the Add/Remove applet in Windows, or by launching the “uninstall-wubi.exe” file in the install folder as shown below.
[Image Credit:wubi-installer]
Read More...